
Almost every office and household with a computer has a printer, but the users overwhelmingly limit their printers to only plain paper printing. Printers are multipurpose machines, designed for all other uses that include printing and working on different surfaces other than papers. Take a look at these fascinating non-plain copy paper things that you can create with your home printer.
Home printer can Make Custom Labels and Decals
In the absence of a label maker, you can still use your laser printer to create yours. If you follow Weblog The Proper Pinwheel by Lexy Ward, you’ll learn how to use packing tape and lukewarm water (bowl size) to create basic clear labels. After you must have printed out your label in a column, get a clear packing tape and cover the paper with it. Ensure that it’s void of bubbles and then trim the excess paper. Sink it deep in a bowl of water for about 5 to 6 minutes and use any object to hold it under water. Ward uses a stone for that. When it’s time, get it out and gently remove the tape from the wet paper while ensuring that you don’t ruin the lettering. Now, put the labels on plastic, glass or metal. Get the bubbles smoothened out and with a gloss or sealant, you can make it stay on. With this method, you are sure to create clear labels of all sizes and fonts.
For a more decorative design, Kristine at weblog The Painted Hive gives this explanation on creating professional looking decals using water-slide decal paper together with a clear acrylic sealer, plus your home printer. After printing off your design, have it sprayed with the acrylic sealer. Now trim the lettering and deep it entirely in lukewarm water for just 45 seconds. Have the backing removed and keep it anywhere. These are permanent decals to be placed on glass, plastic, wood as well as ceramic.
Home printer: Printed Images Transferred to Metal or Wood
An inkjet printer can help you print images on the glossy area of used label sheets or stickers and transfer them onto the wood. Place it on the wood carefully. Use bare wood that can absorb the ink.
inkAID Transferiez is one of the products that simplifies the transfer of images to surfaces like metals. Check out the demonstration Artist Kathyanne White gives on transferring an image to brass with the use of inkAID Transferiez.
Texturize the metal using the rough area of a sponge. Next, use the transfer medium’s thin layer to apply. Now gently place your glossy surface while the image is on it. Finally, smooth the surface down for the ink to settle for a couple of minutes as the image transfers to the metal.
Print Custom Gift Bags, Napkins, and Your Party Photo Cake
This method is your best way to have a less expensive photo cake as Computer Shopper Sarah E. Andersen (aka TechMom) explains its DIY ( Do It Yourself) method. With edible paper sheets and edible ink cartridges from web sites such as Kopykake, you can print in multiple shapes and sizes using these packs of 24, ( good for children’s parties).
At weblog A Subtle Revelry, Victoria Hudgins suggests that you make it classy by printing out napkins using custom images and words using your inkjet printer which is better than stored prints. Put the napkin in the printer well folded and use a word processor to type out your choice of words.
At the end of the party, you can have custom gift bags given to your guests to take home. According to Kathleen at weblog Twig and Thistle, who has mastered turning mere plastic bags into custom worded gift bags, centering your design or wording on the paper in the tray is key.
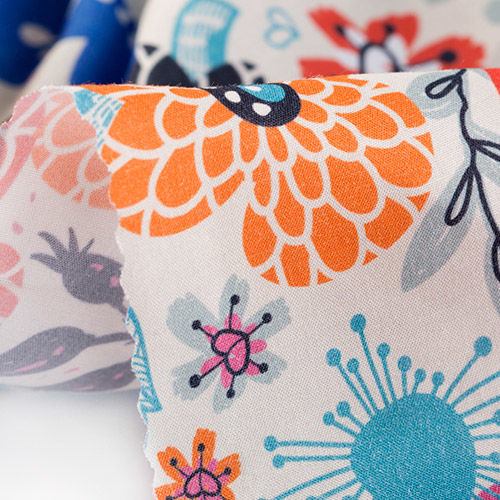
Print on Fabric for Custom Clothing

An inkjet printer also allows you to print customized designs, wording and pictures on fabric. Following a simple method used by YouTuber Professor Pincushion, anything printable is okay on a fabric. With a plain 100% cotton white fabric and a product for treating fabric, the ink will set in well in the fabric. A freezer paper and some detergent or mild soap are important requirements. Cut more than 8.5″x11″ of your fabric provided it shrinks. With treatment solution in a pan or plastic container, place and submerge the fabric fully and then remove it in five minutes. Once it dries, press it flat with an iron and cut out an 8.5″x11″ size of the freezer paper. Place and iron the freezer paper’s waxy side down to the fabric. Now cut the fabric to that size.
With everything now sized up, place the sheet on your home printer. Test print a piece of paper first to avoid making a fabric side mistake. Any Ink will do. Simply cut out your designs and attach on t-shirts, jackets, pants, sweatshirts, etc and get excellent results.
In this digital age, you’ve to make the most of your home printer. using all these simple methods above. Though printer ink is expensive, refilling your own cartridges is easy on the pocket.
Need affordable ink or toner?
At Inktonerstore, we provide our customers with the best printer supplies at reasonable prices. Our goal is to provide excellent quality ink cartridges, toner cartridges, and other printing supplies at the lowest cost while offering the best shopping experience.